Install Guide
Detailed instructions on how to get Starsiege: Tribes running on a modern PC.
- Grab a config from the homepage
- Create a folder to install Tribes into (e.g. C:\Games\Tribes)
- Open your anti virus and white list the folder you created, for Windows Defender:
- Open Windows Defender Security Center
- Click Virus & threat protection
- Click Virus & threat protection settings
- Scroll down to Exclusions
- Click the Add or remove exclusions
- Click the Add an exclusion button to display a drop-down list
- Select Folder you Previously Created
- Unzip your Tribes config into the folder you created
- Navigate to the root directory of the config where Tribes.exe is located
- Right click Tribes.exe, click on properties, and select the compatibility tab, click Change high DPI settings. Under the High DPI scaling override section click the check box and leave the setting set to Application.
- Ensure that rasadhlp.dll is in the root directory of your config (where Tribes.exe is located)
- Compare the plugins folder in your config to the plugins folder of the zip file you downloaded. If any of the plugins (.dll files) are missing you need to whitelist the folder in your AV (Step 3) and copy the missing files.
- Return to the parent folder of your Tribes config and open the Tribes_win8or10_PluginFix_REG folder.
- Run win8_pluginfix.reg
- Create a profile for Tribes.exe in your graphics card settings, for Nvidia:
- Right click your desktop and click on NVIDIA Control Panel
- Expand 3D Settings (on the left) and select Manage 3D Settings.
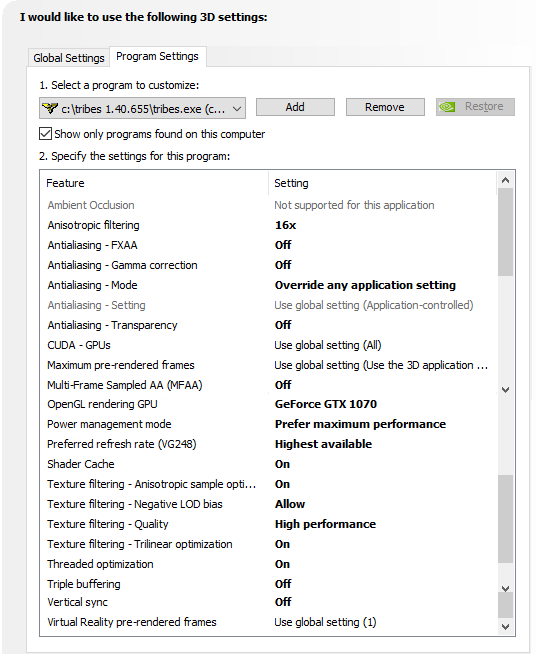
- On the right hand side click the Program Settings tab
- Click the Add button and navigate to Tribes.exe (using either) the list of recently used applications or by clicking the browse button and navigating to the directory.
- Set Vertical sync to Off (this is critical)
- Additionally you can copy the settings in this image for increased performance and visual appeal.
- Open the windows Control Panel, open the Mouse settings, click on the Pointer Options tab, ensure that the Enhance Pointer Precision check box is unchecked.